Digital Scanning & Microfilm Equipment – DS & ME are the official Australian Distributors for the A&P International range of Resolution Calibration Test Target/s – Chart/s – Pattern/s – Image/s for general & specialised Scanners.
No matter what size of equipment you have installed we can provide Resolution Calibration Test Target/s – Chart/s – Pattern/s – Image/s ranging in size from as small as 89 X 102 mm to as large as 812 X 1219 mm.
Standard Resolution Calibration Test Target/s – Chart/s – Pattern/s – Image/s in the approximate DIN sizes of A4 – A3 – A2 – A1 – A0 are also available as stock items ex our USA production centre.
Any organisation or end user who wishes to meet Quality Assurance, Archival and possibly Legally Admissible images of scanned – imaged information will undoubtedly want to guarantee that the images produced meet these exacting standards and to have the recorded data to prove that the equipment utilised meet these standards by testing via the use of Resolution Calibration Test Target/s – Chart/s – Pattern/s – Image/s to meet designated International Standards.
Any organisation subcontracting work that has a requirement to meet any of the above would be placing themselves in a potential position of non compliance if they do not stipulate in their Requests for Quotation or Tender – RFQ or RFT documentation a clause stipulating that work subcontracted or outsourced meets these International Scanning – Imaging Standards.
The State Records Office of Western Australia’s – General Disposal Authority for Source Records – RD 2009027 – Published July 2009 has the following requirements for the Calibration of general document scanning equipment @ The State Records Office of Western Australia’s – General Disposal Authority for Source Records – RD 2009027 – Published July 2009.
Calibration of equipment
All equipment is calibrated in accordance with relevant international standards and calibration checks are undertaken at regular intervals, such as monthly or annually, depending on the quantity of digitization undertaken. A master calibration target should be maintained for the life of the digitization equipment, and calibration checks should be measured against this target by a second person.
SPECIAL NOTE:
The Resolution Calibration Test Target/s – Chart/s – Pattern/s – Image/s for Scanning – Imaging Quality Assurance Calibration & Testing, legal & statutory compliance & peace of mind from the Varendorff Records Management Consultancy – TVC – meet or exceed the requirements for the Calibration of Scanning Equipment as set down in the State Records Office of Western Australia’s – General Disposal Authority for Source Records – RD 2009027 – Published July 2009.
A&P Scanner Resolution Calibration Test Target/s – Chart/s – Pattern/s – Image/s No matter what size of equipment you have installed we can provide Resolution Calibration Test Target/s – Chart/s – Pattern/s – Image/s ranging in size from as small as 89 X 102 mm to as large as 812 X 1219 mm.
Standard Resolution Calibration Test Target/s – Chart/s – Pattern/s – Image/s in the approximate DIN sizes of A4 – A3 – A2 – A1 – A0 are also available as stock items ex our USA production centre. Any organisation or end user who wishes to meet Quality Assurance, Archival and possibly Legally Admissible images of scanned – imaged information will undoubtedly want to guarantee that the images produced meet these exacting standards and to have the recorded data to prove that the equipment utilised meet these standards by testing via the use of Resolution Calibration Test Target/s – Chart/s – Pattern/s – Image/s to meet designated International Standards.
Full details on the ANSI-AIIM Standard MS44-1988 [REVISED 1993] titled “Recommended Practice for Quality Control of Image Scanners” is available online @ Recommended Practice for Quality Control of Image Scanners Document Number: ANSI/AIIM MS44-1988 ( R1993 ) titled “Recommended Practice for Quality Control of Image Scanners”.
A&P Scanner Resolution Calibration Test Target/s – Chart/s – Pattern/s – Image/s – Quality Control History Thirty years ago back in the 1970’s A & P International entered the Microfilm Resolution field with an array of some 22 distinct photographically produced Resolution Calibration Test Target/s – Chart/s – Pattern/s – Image/s. All our Microfilm Resolution Calibration Test Target/s – Chart/s – Pattern/s – Image/s meet or exceeded the industry standards of NIST 1010a, ANSI/ISO, AIIM & supporting ARMA’s policies.
Happily A & P International exposure is worldwide both directly and via its dealer network. Through the years a number of A & P International’s standards qualities for Scanning – Imaging Resolution Calibration Test Target/s – Chart/s – Pattern/s – Image/s have been tailored for specific manufacturer’s cameras e.g. Kodak, Minolta & Zeutschel, to name a few. More recently, Scanner Resolution Calibration Test Target/s – Chart/s – Pattern/s – Image/s have been brought to the attention of scanner users due to Legal requirements.
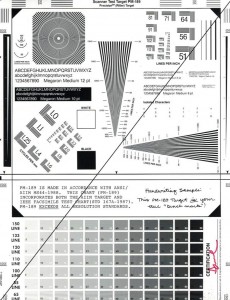
A & P International’s PM-189 Scanner Resolution Calibration Test Target/s – Chart/s – Pattern/s – Image/s operate within a range of 50 to 2,500 Pixels per Inch – PPI for use with facsimile machines and digital image scanning systems.
A & P International’s PM-189 Scanner Resolution Test Target – Chart is a photographically produced target – chart with a 95% reflectance. The PM-189T Scanner Resolution Test Target – Chart is a photographically produced transmission film positive on transparent film @ .004 mil in thickness.
Sizes range from 8.5 x 11 inch or American A size = approximately A4 DIN size and up to 36 x 48 inch or American E size = approximately A0 DIN size. The flawless way to convert scanned images ( for verifiable Quality Control ) for acceptable archival longevity is to capture the PM-189 image from the document-run and transfer it to ( 16 or 35 mm microfilm ) via an Archive Writer which are available from a number of manufacturers!
A & P International’s standard PM-189 ( A-size ) 8.5 x 11 inch = approximately A4 DIN size Scanner Resolution Test Target – Chart contains Highly Improved versions of all resolution images specified in ANSI/AIIM MS44-1988 (Updated 1993) Standard.
PM-189 Scanner Resolution Test Target – Chart users find quality and consistency have become true bench-marks for measuring the performance ( & change in performance ) of scanners, monitor displays and printers.
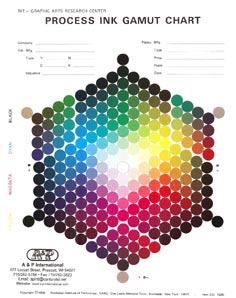
Years ago the Rochester ( USA ) Institute of Technology – RIT sold a Process Ink Gamut Chart but ceased it distribution. A & P International recently secured exclusive rights to print the 8.5×11 inch = approximately A4 DIN size RIT chart. A & P International now provides this Colour Chart free of charge with all PM-189 Scanner Resolution Test Target – Chart orders!
WHY USE SCANNER RESOLUTION CALIBRATION TEST TARGETS?
A Preface to PM-189, PM-189T AND PM-189II SCANNER RESOLUTION CALIBRATION TEST TARGETS
The purpose of an imaging test chart associated with any image transfer system is to give the user the ability to measure the image transfer quality in terms of numbers, which is necessary in order to eliminate wide differences of quality assessment that may result from subjective evaluations. This is true whether the image transfer system is lenses, television, facsimile, copy machines, or digital document storage.
The PM- 189 and PM-189T test charts are designed as standard measuring tools that give a user that capability. The PM-189 and PM-189T give the user the ability to measure in lines per inch. The image resolution that results from a scanner with a certain Pixels per Inch – PPI scanning specification. These test targets are applicable for use on all type image scanner systems that operate within a range of 50 Pixels per Inch – PPI. to 2500 Pixels per Inch – PPI; examples are facsimile machines and digital image storage systems.
The PM-189 and PM-189T test targets exceed all the black and white specifications as recommended by AIIM in their MS44-1988 proposal except as explained in the following:
1. Because it is nearly impossible to maintain consistent grayscale levels at the same time that high resolution images are maintained on the same paper, we elected to keep the high resolution precision as reflected in all characters and patterns on the PM-189 and provide as an option, a 37 step paste-on density scale. The PM-189D designates a PM-189 test chart with the grayscale add-on.
2. The examples of typewriter characters, hand writing, different size type characters, and different size mesh half tones are photographic reproductions instead of printed reproductions. The photographic reproductions were purposely used because we believe that a good reference standard should incorporate the sharpest images possible, which would not be the case with printed material. The photographic process, in this case, also assures identical patterns from one test target to the next, which is an important consideration in any standard reference.
The quality and consistency from one test chart to the next is guaranteed by the individual inspection that is given to each target.
Each target is certified by a live signature, which attests to the inspection and guarantee.
In addition, the live signature makes it readily apparent to the users whether they have an original chart or an inferior copy. We believe the users will find the PM-189 and PM-189T targets to be true “bench marks” for measuring the performance and changes in performance of their scanner, monitor display, and printer.
It is these precision measuring tools that other targets will be compared against.
For any form of scanning – imaging requirements, no matter how small or complex, please contact us via the Contact Us @ DS & ME facility at this website or email Laurie Varendorff at – Digital Scanning & Microfilm Equipment – DS & ME – Email: Laurie Varendorff & we will do everything in our power to fulfil your requirements.
For any book, drawing, map or plan plus archival document or fragile material no matter the size – e.g. less than A 5 = 148 x 210 mm = ( 5.83 x 8.27 inches ) or up to Double A 0 Plus = 2,000 x 1,210 mm = ( 78.7 x 47.64 inches ) – which requires Scanning, Digitising = Digitizing & or Imaging for your Digitisation Projects, no matter how large or small then contact Laurie Varendorff @ email @ Laurie Varendorff ARMA; or Phone: Australia @ 0417 094 147 – International @ +61 417 094 147 at Digital Scanning & Microfilm Equipment – DS & ME.
Laurie will be able to advise if DS & ME has the specialised equipment available for the Scanning, Digitising, & or Imaging from a minimum size of A 6 = 148 mm in width by 105 mm in height up to a maximum size of over Double A 0 = 1189 mm plus in width by 841 mm plus in height for books or Fragile Document/s, Map/s, Plan/s or Engineering, Architectural plus other types of Drawing/s required to meet a prospective client’s individual requirements.


